*This post may contain affiliate links for which I earn commissions.*
Dyeing brown eggs is a unique twist on the traditional Easter egg decorating practice. Unlike their white counterparts, brown eggs have a darker shell that can challenge the vibrancy of some dyes.
However, with the right preparation and techniques, brown eggs can be transformed into beautiful, richly colored Easter decorations. The natural shades of brown provide a warm, earthy canvas for dyes, resulting in a more muted, but equally delightful array of colors.

Choosing suitable dyes and color palettes is crucial for brown eggs, as not all colors will show up as expected.
Natural dyes from the homestead that are made from vegetables, fruits, and spices offer a range of hues that complement the brown shells perfectly.
Experimenting with different dyeing techniques can also lead to exciting results, such as creating gradients, patterns, or using waxes to resist color.
Personal touches such as stickers, glitter, or paint can further customize these Easter treasures.
Preparing for an Easter egg hunt with brown dyed eggs can also offer a surprising advantage. Their natural camouflage can make the hunt more challenging and enjoyable, providing seekers with an extra level of excitement as they search for these hidden gems.
Key Takeaways
- Proper preparation of brown eggs enhances dye adherence and color richness.
- Selecting appropriate colors and employing various techniques can yield stunning results on brown eggshells.
- Brown dyed eggs can add an element of challenge and fun to Easter egg hunts.
Preparing the Brown Eggs for Dyeing
Before we begin dyeing, it’s essential to choose the best brown eggs and boil them properly. This ensures that the eggs are ready to take on the vibrant colors without any hiccups.
Choosing the Right Eggs
When selecting brown eggs for dyeing, I look for ones that have smooth shells without any cracks. A consistent shape is also key for an even dye application later on.
Freshness matters, so I aim to use eggs that you recently gathered from your hens or if you’re buying them make sure they aren’t close to their expiration date, which I find generally gives me the best results.
- Freshness: Use Freshly gathered or Check the sell-by date. Fresh eggs hold dye better.
- Shell Integrity: No cracks or abnormal bumps.
- Shape: Opt for uniformly shaped eggs for consistent dyeing.
Boiling and Cooling
Boiling eggs is a simple but crucial step in the preparation process. Here’s how I do it effectively:
- I gently place the brown eggs in a single layer at the bottom of a pot.
- I cover them with about an inch or two of cold water.
- I bring the water to a rolling boil and then let it simmer for about 12 minutes or more for hard-boiled eggs.
- Once boiled, I immediately transfer the eggs to a bowl of icy water to cool them down quickly; this also makes peeling easier if needed.
- Boiling Time: Around 12 minutes or more for an ideal hard-boiled egg.
- Cooling Method: A plunge into icy water in the fridge, stopping the cooking process.
Remembering to transfer the boiled eggs to the fridge if I’m not dyeing them immediately helps to keep them at their best.
Now, with the eggs boiled and cooled, I’m ready to move on to the creative part — dyeing!
Selecting Colors and Dyes

When I dye brown eggs, choosing the right colors and dyes makes all the difference. I often consider the final hue I want to achieve and whether I prefer using food coloring or natural dyes for a more eco-friendly approach.
Using Food Coloring
I find that food coloring offers vivid and consistent results when dyeing eggs. To get the perfect shade on brown eggs, which have a darker starting color than white eggs, I use these techniques:
- For bold colors: I mix generous amounts of food coloring with about a teaspoon of white vinegar and a cup of hot water.
- Layering colors: If I’m going for a green or orange hue, I start with yellow as a base before adding blue or red.
With food coloring, achieving shades like blue or yellow can be straightforward. However, producing a true orange on a brown egg can require layering colors, as direct application might not yield the desired brightness.
Opting for Natural Dyes
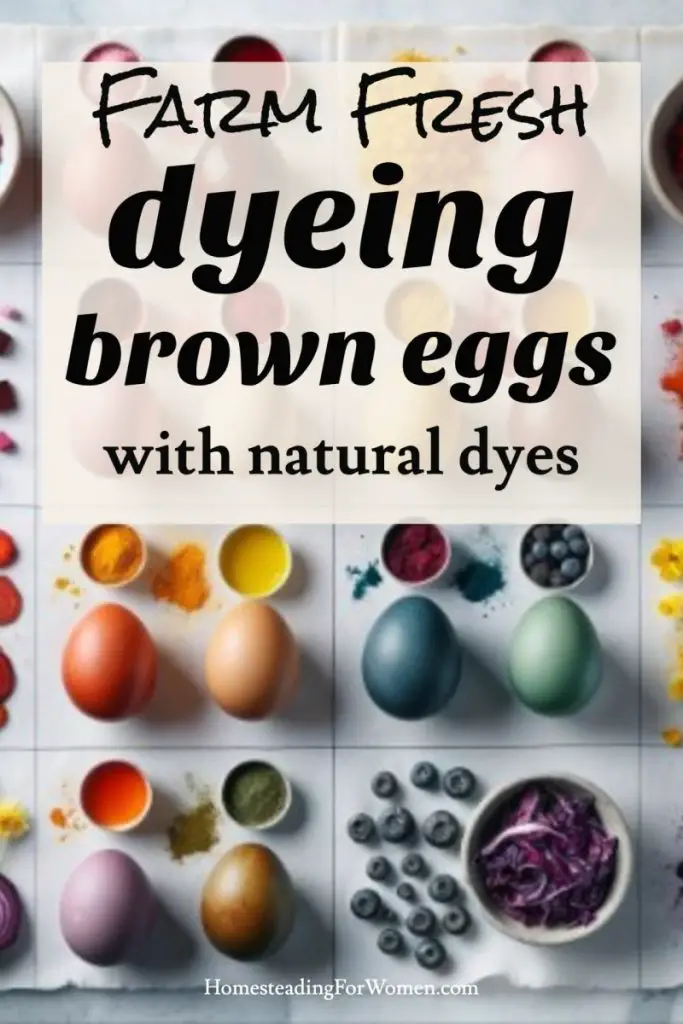
I adore using natural dyes for their gentle and unique outcomes. It’s amazing how common kitchen ingredients produce a rainbow of colors:
- Blue: Crushed blueberries create a beautiful shade.
- Yellow: Turmeric powder is excellent for a vibrant yellow.
- Green: To make green, I first dye the egg yellow using turmeric, then I add a layer of blue from boiled cabbage, I cheat and use cabbage powder.
I simmer my natural dye ingredients in water for 15 to 30 minutes, then cool the mixture to room temperature.
After straining to remove solids, I add a tablespoon of vinegar, which helps the dye adhere to the eggshell better.
Dyeing with natural substances can result in muted tones, giving the eggs a rustic and earthy appearance. For instance, beets provide a subtle earthy tone on brown shells, not quite the vibrant red you get on white eggs, but still beautiful.
Techniques for Dyeing Brown Eggs

When working with brown eggs, I often find that traditional dyeing methods used for white eggs need a bit of tweaking to achieve vibrant colors. The natural hue of brown eggs tends to mute the colors, so I use techniques that enhance the dye’s effect.
Creating Vibrant Tones
For dyeing brown eggs, it’s important to know that standard dye kits may not always give the desired vibrancy. Here’s my method:
- Prepare a dye bath in a saucepan by mixing a dye tablet with a cup of boiling water and a tablespoon of vinegar. Vinegar helps the dye adhere to the eggshell better, especially when dealing with the darker base color of brown eggs.
- Submerge the eggs in the dye bath longer than you would for white eggs. This helps to build a more intense color. Typically, I leave them for about 15-20 minutes, checking occasionally to see how the color develops.
For a DIY approach, I like to use natural dyes made from food items such as beets or blueberries. These create a more earthy and rich color on brown eggs.
Employing the Wax-Resist Method
The wax-resist method is one of my favorites for adding unique patterns to the dyed eggs. Remember this from grade school? I do!
It’s simple:
- Before dyeing, draw designs or your name onto the eggs using wax crayons or a piece of candy. White works excellently for contrast but don’t hesitate to experiment with colored crayons for more intricate designs.
- Once you’ve applied the wax, prepare your dye bath. I find that using egg dyeing kits provides a more extensive range of colors and saves time.
- After prepping, dip the eggs into the dye. The areas covered in wax will resist the dye and reveal the design once the wax is removed after the dyeing process.
Decorating and Personalizing
Egg decorating is a wonderful way to express creativity and add a personal touch to any celebration, especially during Easter. As I guide you through innovative ideas and accessory use, you’ll find that decorating brown eggs can lead to stunning results, with their unique, rich color offering a warm canvas for designs.
–>Free Easter Rabbit Stationery Paper
–>Free Easter Printables Activity Pages
Accessorizing with Crafts
- Ribbons & Lace: Wrapping a delicate lace or a colorful ribbon around the egg can add a touch of elegance. Simply use a dab of glue to secure it in place.
- Stickers & Sequins: A quick way to add sparkle is by pressing stickers or sequins onto the egg surface. Kids especially love this easy method.
| Craft Supplies | Application Method | Visual Effect |
|---|---|---|
| Glitter Glue | Paint onto egg surface | Shimmering highlights |
| Washi Tape | Wrap around egg in strips | Geometric patterns |
| Fabric Scraps | Apply with craft adhesive | Textured appearance |
Innovative Decorating Ideas
I’ve found that incorporating household items can transform egg decorating into a unique experience:
- Crayon Shavings: While the egg is still warm after boiling, sprinkle crayon shavings over it. They will melt, creating a colorful, waxy coating.
- Food Coloring Drops: Combine food coloring with vinegar and water to make different dye colors. Gently submerge your egg using a spoon to achieve a vivid, even hue.
To keep your work surface clean, always lay down paper towels or an old tablecloth before starting. This not only makes clean-up a breeze but also allows you to be carefree and experimental with dyes and decorations.
Easter Egg Hunt Preparation
In preparing for an Easter Egg Hunt, I always prioritize safety and fun. Ensuring that my dyed eggs are stored properly and the hunt is well-planned are crucial steps.
Storing Dyed Eggs
Once I’ve dyed my eggs beautiful shades of brown and other vibrant colors, I make sure to store them in the refrigerator.
It’s important to keep them in an egg carton to prevent them from cracking and to retain their freshness until the Easter Egg Hunt begins.
- Refrigeration Time: As soon as the eggs are dyed and dry, I refrigerate them for a minimum of 1 hour.
- Temperature: I keep my fridge at a steady 40°F (4°C) to ensure the eggs stay fresh.
Planning the Hunt
When planning the actual hunt, I like to define clear boundaries where the Easter Egg Hunt will take place to ensure it’s a safe environment for all participants.
I often use colorful streamers to mark the designated areas.
- Setting Boundaries: I consider the participants’ ages and use a mix of easily visible spots and a few challenging locations.
- Egg Distribution: I distribute the colored eggs evenly. I place them in plain sight for younger children and in more hidden spots for the older ones for variety and fairness.
- Using Plastic Eggs: For added safety, especially if the eggs won’t be consumed immediately, I sometimes use plastic eggs filled with small treats, to avoid any risk of foodborne illnesses.
Before You Go…
I hope you enjoyed this article on dyeing brown eggs. Many of us homesteaders have farm fresh eggs that are not the normal white eggs you buy in the grocery store. I thought this might be helpful to you and others for Easter. Everyone will enjoy your colorful eggs for the festive event, and the kids will love finding those out in the yard.

Hi! I'm Michelle. You can find me planning, cooking, and often wrangling chickens in my spare time (who am I kidding? I have no spare time). I am the CEO and creator for homesteadingforwomen.com. All posts are reviewed and updated personally by ME - if you have any questions, feel free to contact me here.
- Cozy Fall Farmhouse Decor Ideas - October 4, 2025
- Fall Cleaning Checklist: 10 Easy Tips to Declutter & Organize Before the Holidays - October 1, 2025
- How to Harvest Black Walnuts the Easy Grandma Way (Simple Driveway Hack!) - September 27, 2025