

Welcome to Homesteading For Women – we hope you enjoy all our tips and tricks for homestead women! Please note that we use affiliate links and ads to generate income at no cost to you.
There’s something calming about bringing natural elements into your home, and pebbles are one of the easiest and most affordable ways to do just that.
I remember one afternoon a few years ago, I was out walking near the creek behind our property. I wasn’t looking for anything special, just enjoying the quiet. But I started noticing all these smooth, pretty little stones tucked between the grass and the waterline. I ended up filling my pockets with them—probably looked like a crazy rock lady by the time I got home.
That little pile of creek stones sat on my porch for weeks. One day I finally grabbed my glue gun and started turning them into something pretty. I made a picture frame, then a tray, and before I knew it, I was hooked.
If you’ve got a bag of pebbles lying around—or you’ve been saving a little stash like I did—this post is for you. These ten pebble decor ideas are easy to make, budget-friendly, and give your home a warm, rustic feel.
1. Pebble Picture Frames
Take a plain dollar-store photo frame and dress it up with smooth river rocks or pebbles. Use a hot glue gun to attach them around the border of the frame. Stick with all one color for a modern look or mix natural tones for a cozy farmhouse feel.
Supplies:
This makes a sweet handmade gift or a special way to display a favorite family photo.
2. DIY Pebble Candle Tray
This project is simple, but it adds a lot of charm to your space. Take a shallow tray, line it with small pebbles, and place a few candles in the center. You can use tea lights, votives, or small jars. A few drops of essential oil on the stones can add a relaxing scent to the room.
For a rustic style, use a wooden tray. For a cleaner look, try ceramic or glass.
3. Garden Marker Pebbles
Paint larger pebbles with the names of your herbs or vegetables and place them in your garden or flower pots. It’s a charming and practical way to keep track of what you’ve planted.
What you’ll need:
- Flat stones
- Outdoor paint pens or acrylic paint
- Clear sealant (optional)
This is also a great project for kids or grandkids to join in on.
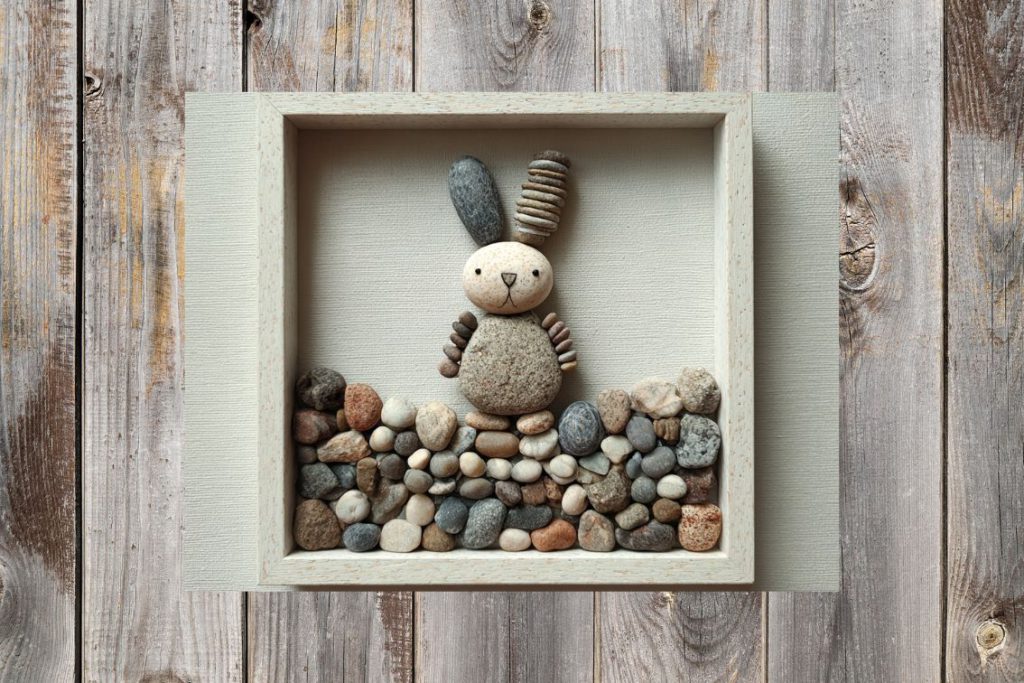
4. Pebble Art Shadow Box
Arrange pebbles into simple shapes like birds on a wire, a heart, or a tree, and glue them onto cardstock or canvas. Frame it in a shadow box and hang it up or give it as a gift.
Ideas:
- A couple of birds for an anniversary or wedding gift
- A family tree using small stones and twigs
- A row of hearts for seasonal decor
- A cute rabbit with a painted face
This project looks beautiful and feels meaningful, especially when you add a personal touch.
5. Rustic Pebble Coasters
Use cork circles or cut your own from a roll of cork. Glue small pebbles tightly onto the surface and seal with Mod Podge or another clear coat. These are especially cute in farmhouse or cabin kitchens.
You can bundle a set with twine and a little tag to make a thoughtful handmade gift.
6. Spa-Inspired Pebble Bath Mat
For a project with a bit more effort, try making your own bath mat. Use a rubber welcome mat and glue down smooth, flat stones with waterproof adhesive. Let it dry thoroughly before using.
This gives your bathroom a spa-like feel and works great under indoor planters too.
7. Pebble Tree Wall Art
Create a tree shape using a canvas or heavy cardstock. Use a line of pebbles for the trunk and branches, and fill the canopy area with stone “leaves.” You can paint a soft background or leave it plain.
Try using warm-colored pebbles for a fall-inspired look or white and gray stones for a minimalist style.
8. Floating Pebble Centerpiece
Fill a clear glass bowl with water, drop in a handful of small pebbles, and float a few tealight candles or fresh flowers on top. This makes a lovely centerpiece for a summer table or porch gathering.
For a more colorful option, use flowers like marigolds or mini roses from your garden.
9. Pet Keepsake Stone
This is a sweet and simple project to honor a beloved pet. Use air-dry clay or cement to create a base, press your pet’s paw print into the center, and surround the impression with small pebbles.
Write the pet’s name and date into the clay using a toothpick or small rubber stamp. Once it’s dry, place it in your garden or on a shelf.
10. Pebble Soap and Sponge Tray
Line a shallow ceramic or glass tray with smooth stones to create a simple way to elevate your sponge or soap at the sink. This helps keep things dry and adds a touch of natural style to your kitchen.
I made one with gray and black stones and set it next to a white enamel sink—it looks clean and rustic, all at once.
Free Pebble Art Templates to Get You Started
Want to try pebble art but not sure how to lay out your design?
There’s a great free printable available online that includes simple templates to guide you—like birds on a branch and heart shapes. It’s perfect for beginners or if you want to do a fun afternoon project with the grandkids.
Click here to grab the free Pebble Art Template from Twinkl
My Favorite Supplies for Pebble Crafts
Here are a few affordable supplies I’ve used or recommend for these pebble projects. You can find most of these on Amazon or at your local craft store.
- Mixed River Pebbles – Great for coasters, frames, and trays
- Paint Pens for Rock Art – Waterproof and easy to use
- Shadow Box Frames – Ideal for DIY wall art or gifts
- Mod Podge or Craft Sealer – Helps protect your projects
- Hot Glue Gun and Glue Sticks – A must-have for all pebble crafts
Final Thoughts
I never expected a few stones from the creek to inspire so many craft projects. But once I started, I couldn’t stop. It’s such a peaceful way to get creative without spending a lot of money—and the finished pieces are always meaningful.
If you’ve got a little stash of pebbles waiting for a purpose, try one of these ideas. Start small, use what you have, and see where your creativity takes you. And if you do try one, I’d love to hear how it turns out.
Happy crafting.

Hi! I'm Michelle. You can find me planning, cooking, and often wrangling chickens in my spare time (who am I kidding? I have no spare time). I am the CEO and creator for homesteadingforwomen.com. All posts are reviewed and updated personally by ME - if you have any questions, feel free to contact me here.
- Caring for Aging Parents: What I’ve Learned the Hard Way (And Why I’m Planning Ahead Now) - August 4, 2025
- 7 Must Get Beginner Herbal Books For Your Library - July 30, 2025
- What to Have Ready When the Power Goes Out (Even at 6AM!) - July 27, 2025
